How do I connect to the Liberty wireless network? (Account access)
Please follow the steps below to connect your devices to the Liberty's wireless networks.
Note: You MUST be on-campus to connect.
Table of Contents
Laptops and Desktops
Windows
- Click the wireless icon in the bottom right-hand corner of your computer screen.
- Select Liberty-Wireless
Note: Liberty-Wireless is only used to allow you to go through this process and does not allow access to other websites. - In a web browser, navigate to: https://onboard.liberty.edu/
- Click on the Connect this Computer or Mobile Device button.
- Verify that the Windows version matches your computer, then click JoinNow to start downloading the setup application.
- Save and run the file. These steps will vary based on the browser, common browsers are listed below:
- Internet Explorer: Click Run in the bar that shows in the bottom of the window.
- Microsoft Edge: Click Save in the bar at the bottom, then click Run.
- Google Chrome: Click on the file (Liberty-Secure.exe) that shows in the bottom left of the screen.
- Mozilla Firefox: Click Save File, then click the arrow button at the top right of the browser as shown below and click on the file name to run the file.
- When prompted to allow the application to make changes to your computer, click Yes.
- Enter your Liberty username (DO NOT include "@liberty.edu", just the first part) and password, then click Next.
- The application will attempt to configure, connect, and authenticate your computer for network connectivity. Once finished, you will receive confirmation that you have been successfully connected to Liberty-Secure. You are now free to move about the Internet!
macOS
- Select the wireless icon on the top right corner of the screen to bring up a list of wireless networks.

- Select Liberty-Wireless.
Note: Liberty-Wireless is only used to allow you to go through this process and does not allow access to other websites. - In a web browser, navigate to: https://onboard.liberty.edu/
-
Click on the Connect this Computer or Mobile Device button.
- Verify the version of macOS listed matches your computer and select JoinNow.
- Download the file to your computer, then open it.
- Double click on the icon that shows for the Liberty-Secure setup application.
- When asked if you would like to open "Liberty-Secure", select Open.
- Next you will be prompted to enter your Liberty username and password. Once you have entered the information click Next.
Note: Do not include the @liberty.edu in the username field.
Note: The password is not verified to be correct before it is saved in the profile. - Depending on your computer settings you may be prompted to enter in the username and password for your computer.
- After successfully finishing the setup, select done.
- You should now be able to select Liberty-Secure by selecting it from the list of available networks.
- Right-click the disk icon on the desktop for Liberty-Secure and choose Eject "Liberty-Secure".
ChromeOS
Note: Because of limitations of the Chrome OS, the Liberty University IT HelpDesk does not recommend using a Chromebook as your primary device for completing your schoolwork, and as such they are not fully supported. For more information see this article.
- At the bottom right, select the time.
- Select Not Connected
.
- Select Liberty-Secure
- Modify your settings so they match the following settings:
Note: Replace "username" with your regular Liberty username with out the @liberty.edu and "password" with your actual password. - Click the Connect button
Linux
Connecting a Linux computer to the wireless network will require the installation of the utility Network-Manager. This is the only network utility that can connect to Liberty University's wireless network. Most major distributions use Network-Manager (Fedora, Ubuntu, and SUSE)
Note: It is not recommended that you change the network utility to Network-Manager, but rather use a distribution where Network-Manager is the default.
- Identify your Linux computer's MAC address by typing the command ifconfig into the terminal application. The device should read WLAN0 and the hardware address will be listed as MAC address or HWaddr. The MAC address should be 12 characters long containing 0-9 and A-F.
Note: Distributions of Linux have different methods of opening the terminal, most will have it in the list of programs under system utilities, or you can search for terminal. - In a web browser, navigate to https://onboard.liberty.edu/ from a computer that is already connected to Liberty-Secure.
- Click Start on Connect Another Device.
- Enter your Linux computer's MAC address found in step 1, add a device name without the use any punctuation , select Other AirGroup device for Device Type, and clickSave.
- Open the Network-Manager utility, navigate to Manage Connections (this may vary based on distribution) and choose the Liberty-Secure network.
- Enter the following configuration settings using your actual username and password
Note: Do not include @liberty.edu, only the username - Click the OK button.
Mobile Devices
iOS
- Open the Settings app.
- Tap on Wi-Fi
- Tap on Liberty-Wireless
- In a web browser, navigate to: https://onboard.liberty.edu/
- Click on the Connect this Computer or Mobile Device button.
- Follow the steps to download the profile.
- Go to the Settings App, tap Profile Downloaded, then tap Install.
- May need to enter a Passcode, tap Install, then tap Install Again.
- Type in your Liberty Email, tap Next, type in your Password, tap Next, then tap Done.
Note: Do not use @liberty.edu in the username - Go back to the Wi-Fi screen and tap on Liberty-Secure.
Android
General Setup
- Open your phone's Settings app.
- Tap Connections
- Tap on Wi-fi
- Tap on Liberty-Wireless
- In a web browser, navigate to: https://onboard.liberty.edu/
- Click on the Connect this Computer or Mobile Device button.
- Install the JoinNow app when prompted, and then to click Continue after it is installed.
- Sign in with liberty username and password
Note: Do not use @liberty.edu in the username - Go back to the Wi-Fi screen and tap on Liberty-Secure
Phase 2 Authentication Setup
- Open your phone's Settings app.
- Tap Connections
- Tap on Wi-fi
- Tap on Liberty-Secure
- Match the following settings:
- EAP method: PEAP
- Phase-2 authentication:MSCHAPV2
- CA certificate: unspecified or Do not validate
- Enter your Identity as SENSENET\username
- Note: Replace "username" with your actual liberty username with out the @liberty.edu
- Anonymous identity: Leave blank
- Enter the password associated with your Liberty account
- Tap Connect.
- Your device should show "Obtaining IP address from Liberty Secure..." then shortly after "Connected to Liberty Secure".
Smart TVs, gaming systems, and other devices
For most devices, use the steps below to connect. for more specific step for your device, check the Table of Contents for your device and follow the instructions in that section
Note: These devices will not connect to Liberty Secure, but will authenticate through Liberty-Wireless for network connections.
Connecting your Smart TV, PlayStation, Xbox, Blu-ray player, or streaming device can be completed in a few easy steps.
-
- Go to https://onboard.liberty.edu from a device that is already connected to Liberty-Secure.
- Click “Register Another Device”
- Type in your Liberty Email and Password and select Login.
- Enter the MAC Address of your device and a Device Name without the use of punctuation.
- Select Register. If you wish to register another device, click the Register Another? button, otherwise you may close the browser window.
- Connect that device to Liberty-Wireless network
Note: Device may need to be restarted if connection is not initially successful.
- Go to https://onboard.liberty.edu from a device that is already connected to Liberty-Secure.
PlayStation 4
-
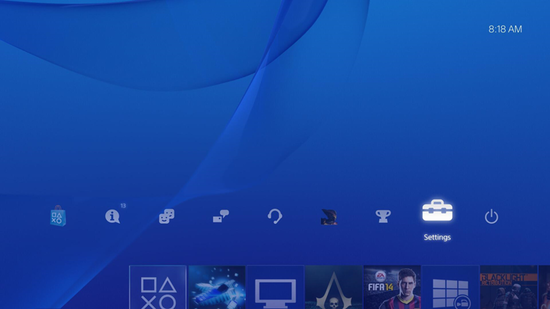
- Start up your PlayStation 4 without a disc.
- Navigate to the "Settings" icon
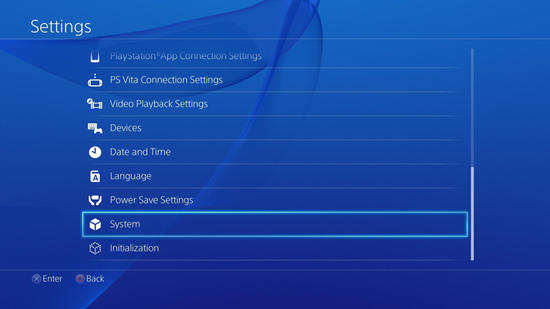
- Select the "System" icon under the Settings menu.
- Select “System Information."
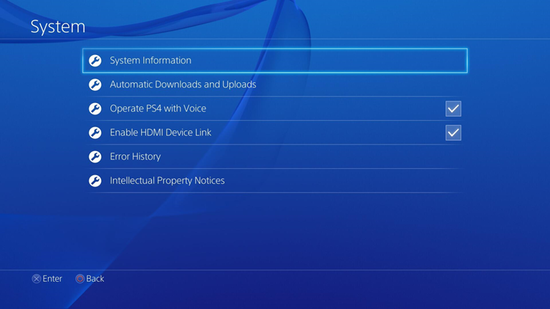
- You will see your MAC address listed on this screen, containing letters and numbers in the format xx.xx.xx.xx.xx.xx. Write down your Wi-Fi MAC address.
- Follow the steps here to finish the device registration process.
- Start up your PlayStation 4 without a disc.
Xbox One
- Press the Xbox button
to open the guide.
- Select Profile & system > Settings > General > Network settings > Advanced Settings.
- You will see your MAC address listed on this screen, containing letters and numbers in the format xx.xx.xx.xx.xx.xx. Write down your Wi-Fi MAC address.
- Follow the steps here to finish the device registration process.
PlayStation Vita
- From the Vita Home Screen, tap the Settings application and then tap Start.
- Swipe up on the screen to scroll down to the System option, and then tap the System option.
- Tap the System Information option. You will see your MAC address listed on this screen, containing letters and numbers in the format xx.xx.xx.xx.xx.xx. Write down your Wi-Fi MAC address.
- Follow the steps here to finish the device registration process.
Nintendo Wii U
Note: Full functionality for all services may be limited on Liberty's network, and Nintendo has also removed some services as well.
- From the Wii U Menu, select System Settings (your icons may be arraigned differently than shown, look for the wrench icon)
- Using the left stick, select the Internet icon and press the A button.
- Select View MAC Address. You will see your MAC address listed on this screen, containing letters and numbers in the format xx.xx.xx.xx.xx.xx. Write down your Wi-Fi MAC address.
- From the main Wii U Menu, select System Settings.
- Using the left stick, select the Internet icon and press the A button.
- Using the left stick select Connect to the Internet
- Using the left stick select Liberty-Wireless from the list of available wireless networks.
- Wait while the console tests the network connection and select OK.
- A dialog box will appear asking if you would like to set this as the default connection. Select Set.
- Follow the steps here to finish the device registration process.
Nintendo Switch
- From the Home Screen, select System Settings.
- Select Internet on the left side of the screen. Take note of the MAC Address, will be shown below Connection Status
- Follow the steps here to finish the device registration process.
Nintendo 3DS/2DS
- From the Home Menu, select the System Settings Icon.
- Select Internet Settings.
- Tap Other Information.
- Tap Confirm MAC Address.
- Follow the steps here to finish the device registration process.
Amazon Echo
Liberty’s network allows the use of these devices, however, some functionality may be limited due to connected devices being on two separate networks (i.e. Phone on Secure and Echo on Wireless)The Echo MUST be configured as Other AirGroup Device or else it will not work correctly
- Install the Amazon Alexa app from the App Store
- Log in using an Amazon account.
- Select your type of Echo device.
Note: If the Orange light is not on, press and hold the action button until it does or restart the device) - Connect directly to the Echo device.
- Proceed with setup as normal.
- When trying to connect to the network, scroll to the bottom to show mac address.
- Continue setup
- After setup, verify the Echo is operating normally (no lights should be on and you should now be able to make queries [i.e. “Alexa, what’s the weather today?”] and ensure that your cell phone is connected to Liberty-Secure)
Google Home
Liberty’s network allows the use of these devices. However, some functionality may be limited due to connected devices being on two separate networks.
(i.e. Phone on Liberty-Secure and Home on Liberty-Wireless)
A Google Account MUST be used for the setup – If a student attempted to setup with their Liberty credentials, this will not work.
(You can see the active account looking at the top of the slide over menu in the Google Home app)
- Install the Google Home app from the App Store.
- Log in using a Google Account.
- Connect directly to the Home.
- Proceed with setup as normal.
Note: on Android, click the 3-dot menu before selecting Liberty-Wireless to view the mac address. Otherwise the device will continue trying to connect to Liberty-Wireless and will have to be reset to retry. - When trying to connect to the network, tap the 3 dot icon in the upper right and then tap show mac address.
- Follow the steps here to finish the device registration process for both the device and again for the phone used to set it up.
Note: make sure for the phone, you use the Register another device button instead of the mobile device button and use the mac address for the phone. - Finish setting up the device by tapping Next, then tapping Continue in the bottom right corner.
- After setup, verify the Home is operating normally (no lights should be on and you should now be able to make queries [i.e. “Hey Google, what’s the weather today”].
- On the cell phone, go back to the Wi-Fi settings of the device and switch the network back to Liberty-Secure and forget Liberty-Wireless so that it doesn't connect back to that network.
Fitbit
Note: Fitbit devices use Wi-Fi only during firmware updates or music transfers. Once these updates are complete, Wi-Fi turns off automatically. Regular data syncs are performed via the Bluetooth connection to your phone.
You will need to have the Fitbit app installed on your smartphone to complete these steps. Make certain your smartphone’s Wi-Fi and Bluetooth are turned on.
- Locate your Fitbit’s MAC Address by swiping right on your screen until you find the Settings app, then select it.
- Scroll down until you find About, then select it. The MAC Address will be on the next screen. It will be a combination of twelve letters and numbers divided by colons. (Example: 00:AD:12:BB:42:CF)
- On the Fitbit app on your phone, tap the Account icon in the upper right.
- On the next screen, under Account, tap the icon for your device.
- Scroll down until you find Wi-Fi Settings, then select it.
- On the following page, tap Next.
- Wait until the Networks list populates. Two lists may appear on your app screen. The top list, Network (singular) will display the networks (if any) you have previously connected to using your Fitbit. The bottom list Networks (plural) lists the networks that are available.
- In the bottom list, tap Liberty-Wireless.
- If the network is successfully joined, a green checkmark icon will appear on the screen of your Fitbit.
- Follow the steps here to finish the device registration process.
If at any time you want to verify network connectivity, open the Fitbit App on your smartphone and tap Liberty-Wireless in the upper list. If numbers appear in the IPv4 and MAC Address fields, you are connected. If they are blank, you are not. Tap Connect on that page to connect your Fitbit to the Liberty-Wireless network.
Note: The instructions in this article have been confirmed for the Fitbit Ionic with firmware version 27.32.12.19, version 32.12.19 of the Fitbit App, and an Apple iPhone using iOS 12.1. Similar devices should connect using similar steps.
LU-Cyber-Lab (Business Students Only)
This network is only for select Business School classes and exists only in the School of Business. It is a network designed for network security studies. Your business class instructor has to make you a member of the Cyber Excellence Security Students -> General team in Microsoft Teams to get to the onboarding site to get connected. After they have done that, fallow the steps below.
- Go to MyLU.com and click the link Cyber Lab Wireless Onboarding under the My Access widget.
- If your device was automatically detected correctly, click JoinNow and follow the prompts, or select your device from the dropdown box below.
Note: You can follow the screenshots for your device from the Table of Contents after the step to click the JoinNow.
Guest Accounts
Whenever a user connects to Liberty-Guest they will be asked to register. There is a link at the bottom of the page to sign in if they have an Events Account. The purpose of the guest network account is for people who do not have a Liberty Network Account (LNA) to obtain wireless access. If they attempt to register a Liberty email address they will be redirected to onboard to Liberty-Secure.
There are two types of accounts for the guest network:
- Self-Registered: This access level is for people such as family members and visitors who need brief network access during their visit. Users who have Liberty Guest level access will have their bandwidth severely limited.
- Event Account: This access is for non-Liberty users who are attending a special event on campus where the event provides credentials to its participants. The Event Account access level grants those users the same upload and download speeds as normal staff (6Mbps up, 10 Mbps down).
Notes:
- Guest Access has MAC caching, so users don't have to log in again for up to 7 days (default is 1).
- Guest access is strictly wireless. Wired access does not connect to Guest.
- If the same email address is entered on two requests, the most recent request will overwrite the previous ones.
- Guest Access is not available at Old Pate Chapel.
Hardware requirements and recommendations
Note: As of 18 January 2016, Wired network ports in dorms are no longer available for purchase.
Personal devices can only connect to the internet via Wi-Fi.
Wireless Adapter Standards
Liberty Owned Machines:
- IEEE 802.11ac WLAN NIC
- 2.4 GHz/5GHz Dual Band
- 2x2 867Mbps or 3x3 1300 Mbps (20/40/80/160MHz)
- WPA2-Enterprise
Recommended:
- IEEE 802.11ac WLAN NIC
- 2.4 GHz/5GHz Dual Band
- 3x3 1300 Mbps. (20/40/80/160MHz)
- WPA2-Enterprise
Minimum:
- IEEE 802.11ac WLAN NIC
- 2.4 GHz/5GHz Dual Band
- 2x2 300 Mbps (20/40/80/160MHz)
- WPA2-Enterprise
Unsupported:
- IEEE 802.11b/g/n WLAN NIC (2.4GHz-only, not recommended but can connect)
- 2.4 GHz Single Band (not recommended but can connect)
- 1x1 (not recommended but can connect)
- WEP (devices that do not support WPA2-Enterprise cannot connect to Liberty-Secure)
Alternative:
- IEEE 802.11ac or 802.11a/b/g/n WLAN NIC
- 2.4 GHz/5GHz Dual Band
- 2x2 867 Mbps (802.11 AC) or 300 (802.11n) (20/40/80Mhz)
- WPA2-Enterpirse
- Suggested card: http://www.linksys.com/en-eu/products/adapters/WUSB6300
List of Supported Adapters
LU Owned Machine Approved Adapters:
- Intel 7260/65 IEEE 802.11ac 2x2 Dual band WLAN Internal NIC
- Intel 6300 IEEE 802.11an 3x3 Dual Band WLAN Internal NIC
- Asus PCE-AC68 IEEE 802.11ac 3x3 Dual WLAN PCI-E NIC
USB Adapters:
- http://www.linksys.com/us/support-product?pid=01t80000003KBJAAA4
- http://www.netgear.com/home/products/networking/wifi-adapters/a6210.aspx#tab-techspecs
Desktop PCI-E Adapters:
Removing the wireless profile
The following steps will help you through the process of removing the Liberty-Secure Wireless network profile from your devices. You may want to do this due to leaving the university or during troubleshooting of the connection.
Note: You do not have to be in range of the network in order to remove it.
Desktop |
Mobile |
|---|---|
Windows
- Launch an elevated command prompt; the easiest way to do this is on the keyboard, press the Windows Key, type CMD and then hit Ctrl+Shift+Enter or by clicking Run as Administrator.
- To delete the Liberty-Secure profile type: netsh wlan delete profile name ="Liberty-Secure"
macOS
- Click the Apple logo in the upper left corner of your screen then click System Preferences.
- Click the View button on the menu bar and select Profiles
- Click on Liberty-Secure, then click the Minus Button bellow to remove it.
iPhone and iPad
Note: The following screenshots are from an iPhone but the steps will match on an iPad, images will differ slightly due to the larger screen on ipads.
- Go into the Settings app on your device
- Select General
- Select Profile near the bottom of the General menu
- Select the Liberty University Liberty-Secure Mobile Profile.
- Select the red Remove Profile button at the bottom of this page
- A prompt should appear on the screen asking for your passcode if you have one set up.
- Select the Remove button to finalize this process
Android
- Swipe down from the top to open the Control Panel and tap the Gear Icon in the bottom right corner.
- Tap Network & Internet.
- Tap Wi-Fi.
- Tap the Gear icon next to Liberty-Secure.
- Tap Forget.
- If you also had to install the JoinNow app to get connected, this should also be removed. Locate the app on the home screen.
- Press and hold on the icon and tap App Info.
- Tap Uninstall then tap OK
Troubleshooting
PC
Common Issues:
Not Connecting to Wireless
If the computer will not connect to wireless, try the following steps:
- Close and restart the browser
- Switch to "Liberty-Guest" to see if any connections are possible; then, switch back to the "Liberty-Secure" network
- Follow instructions on KB0013432 to unlock your account.
- Restart the computer
- Run the Windows diagnostics
- Type "cmd" into the run bar to open the command prompt. Then, type "ipconfig /release" and press enter, and then type "ipconfig /renew" and press enter.
- Type "services.msc" in the run bar. Scroll down to find "DNS client", right-click, and press restart
- If it will still not connect, try to restart the computer again
- If none of this works, send the patron to the HelpDesk for further assistance
- Forget Liberty-Guest and/or Liberty-Wireless networks.
Not Accessing the Liberty Website
- First try typing "www." before "liberty.edu". Sometimes this is the simple solution to the problem.
- If typing "www." does not work, there are a few more ways to troubleshoot the issue. First, try accessing the "Network and Sharing Center" using the search bar.
-
- Next, click on "Manage Wireless Networks", then select Liberty-Secure, and select "Adapter Properties"
-
- Under the "Networking" tab, double-click on "Internet Protocol Version 4"
- Under the "General" tab, make sure "Obtain DNS server address automatically" is selected
- If the user has Avast Antivirus 2015 or newer installed:
-
- Disable "Secure DNS" in the Avast settings
- Open the Avast software, go to Settings > Active Protection. Change the switch to off next to "Secure DNS" and click OK. Reload Liberty's website
-
- To prevent the DNS address from reverting back, you must uninstall Sendori. Sendori is a security program that uses DNS. To do this, follow the steps below
- Open Task Manager and cancel the all processes related to Sendori.
- You may have to click to show processes from all users
- Uninstall the program and restart the computer.
- If the computer gives the error that the time and date are incorrect
- Make sure that the laptop is connected to wireless and then try finishing the connection wizard again
MAC
- Returning Students Who Can No Longer Connect
- If returning to campus and keep getting a pop-up saying they cannot connect to the "Liberty-Secure" network, start by turning off the Wi-Fi to stop the pop-up.
- Open System Preferences and go to Profiles.
- Remove any Liberty Wireless Access profiles listed in the left column by selecting the profile and clicking the "-" at the bottom of the column.
- Turn the Wi-Fi back on, and click on "Liberty-Secure", a new window should pop up and the student will need to enter your Liberty username and password.
- Self Assigned IP Address or Missing IP Address
- Open Macintosh HD
- Open the file labeled "Library"
- Click on the file labeled "Preferences"
- Click on the file labeled "System Configuration"
- Then move these three documents to the trash (don't delete them just in case but your computer should remake these documents on its own)
- com.apple.airport.preferences.plist
- com.apple.network.identification.plist
- NeworkInterfaces.plist
- Restart the computer
Unsupported Devices
- Sonos Devices
- PlayStation 3 and PlayStation 4 (Gen1-3)
- Xbox 360
- TP Link Smart Plugs
If you have any trouble following the above steps, please contact the IT HelpDesk by calling 866-447-2869. You can also Chat with us online at www.liberty.edu/hdchat